Contents
ESP8266 is the one of the most popular WiFi SoC (System on Chip) available today. It finds a lot of applications in IoT (Internet of Things), Home Automation fields. In this tutorial we will see how can we connect ESP8266 to a WiFi network.
Modes of Operation
ESP8266 has 3 operation modes. Those are:
- Station Mode
- Soft Access Point Mode
- Station + Access Point Mode
Station Mode:
Connecting to one specific network: ST – Station mode in which ESP acts as a device & connects to an existing Access point.
The ESP8266 can communicate over WiFi in two different modes. It can connect to an existing wireless hot spot, or access point, similar to the way you connect your phone or computer to the Internet. This is called “station” mode. In station mode the ESP8266 board can reach out to the internet and may also communicate with other devices connected to the same network, including other ESP8266 modules.
Soft Access Point (Soft AP)
AP – Access Point mode where the ESP itself acts as AP & other devices like Mobile can connect to it.
Wi-Fi access points (AP) act as a hub for one or more stations (like your phone, or PC). An access point is connected to a wired network and often integrated with a router to provide access to stations connected to it to the Internet. If an access point is not connected to the Internet through a wired network, it is called a soft access point
ESP8266 module can operate as a soft access point (Soft AP) and support up to 5 Wi-Fi client devices, or stations, connected to it.
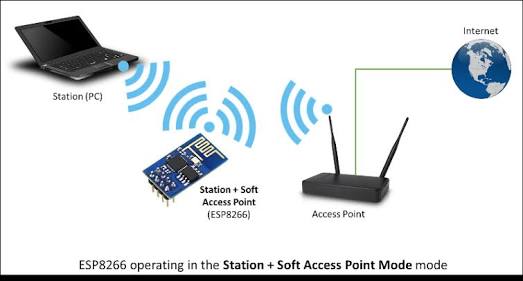
Station + Access Point Mode
The third mode of operation permits the module to act as both an AP and a STA. The mode of operation is set by the AT command.
Note: Read the article Getting Started with ESP8266 Programming – Arduino before following below steps.
Steps
- Get your Routers SSID and Password
- Connect your ESP8266 to your Computer
- Write the below code into Arduino IDE
#include "ESP8266WiFi.h"

// WiFi parameters to be configured
const char* ssid = "SERVER NAME";
const char* password = "SERVER PASSWORD";

void setup(void)
{
  Serial.begin(9600);
  // Connect to WiFi
  WiFi.begin(ssid, password);
  // while wifi not connected yet, print '.'
  // then after it connected, get out of the loop
  while (WiFi.status() != WL_CONNECTED) {
     delay(500);
     Serial.print(".");
  }
  //print a new line, then print WiFi connected and the IP address
  Serial.println("");
  Serial.println("WiFi connected");
  // Print the IP address
  Serial.println(WiFi.localIP());

}
void loop() {
  // Nothing
}
- Save, Compile and Upload the code to ESP8266.
- Verify The Output on the Serial Monitor
- If ESP8266 is not connected then it will display “……” on Serial Monitor
- If ESP8266 is connected then it will display ” WiFi connected and IP address” on Serial Monitor.
Result
Refer the our next article “LED Control by ESP8266 as Web Server – IoT” to control the LED from local server.
